TOP › My Page TOP ›
Submission Workflow › Technical Guides / Submission Tips ›
Cross-Platform Compatibility Guide
Vket has the Cross-Platform Venue. This guide will cover how to make a Quest/Android-compatible space so that visitors can enjoy your exhibit from a mobile environment. Please refer to VRChat Guides for further information.
A common misconception about Quest/Android compatible VRChat world is:
"The shader must be ToonLit, right?"
This is completely untrue. Under VRChat's specifications, shader restrictions are applicable only to avatars.
However, in Vket's Cross-Platform Venue, there are restrictions on the shaders you can use. For the shaders you can use, please check "Shader regulations" in the Submission Rules: Space Exhibition (Cross-Platform Venue).
Also, there are shaders not well-fit to Quest/Android. So please visit preview world on actual mobile devices to check any visual issues of your exhibition.
While it is one of the most strict restrictions due to the specifications of the VRChat, most spaces for concept worlds can be made within this restriction.
In short, it is the file size of the world itself. In the Cross-Platform Venue, the total build size of the world is limited, so the build size per space is limited to 5MB for the Windows build and 3MB for the Android build.
You can check the build size by following the below steps.
- Build the world with Build & Publish button of VRChat SDK
- Open Unity editor log (Open Console window and select "Open Editor Log" from the menu)

- Search for the latest vketscene.vrcw
The "Compressed Size" shown here is the build size. Textures should account for much of this value in most cases.
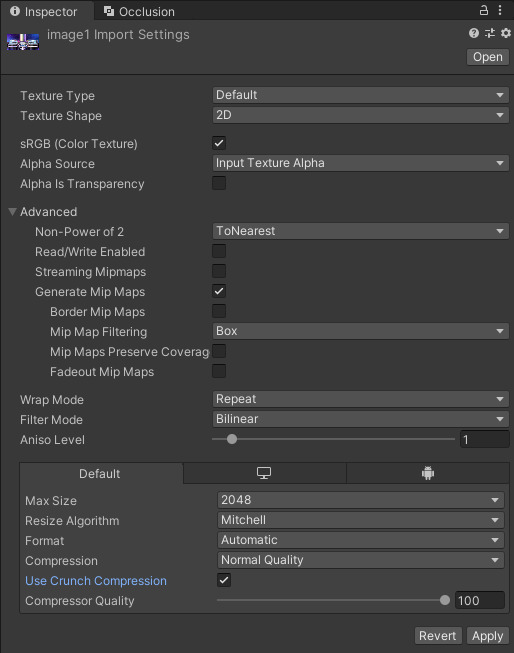
Hence, you should do the following on the Inspector of textures.
Reduce texture resolution. While it is set to 2048 on the screenshot below, 1024 may suffice in some cases.
Changing by one step reduces the pixel count into one fourth, as it is halved twice, achieving much reduction in file size.
Choose Low Quality, Normal Quality, or High Quality, and the engine will pick a format suitable to each platform and compress the texture image.
In most cases, Low Quality will look sufficiently good.
This is almost mandatory for reducing the build size.
Enable the Use Crunch Compression to crunch-compress the image. The higher the Compressor Quality value, located immediately below, the higher the quality and size will be.
In some cases, lowering Max Size and keeping the Compressor Quality yield better results than lowering Compressor Quality.
Trying different settings is the fastest way to find the optimal setting.
If you have sound files, they may take up much volume, but compression is much harder as the sound quality is synonymous with file size in the case of sounds.
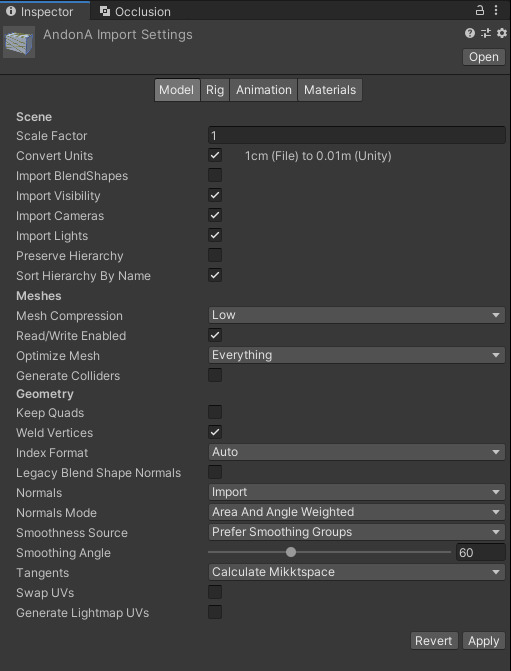
You can reduce the file size of meshes with certain settings.
If you don't use BlendShapes in your space, removing this setting may reduce the file size by a wide margin.
This is effective when you exhibit avatars without animating expressions.
This setting will compress the mesh.
This may affect the look of the model. You should treat it carefully.
If you are not exhibiting avatars, you only need to make sure that the shaders used in your exhibit are allowed under "Shader regulations" in the Submission Rules.
If you exhibit an avatar pedestal in your space, you will need to set the shader of your model to shaders permitted for Quest/Android, in most cases ToonLit.
Also, you need to remove Dynamic Bone if it has any. There is also limits imposed on Physbone for Quest/Android.
For now, if the avatar's Performance Rank became Very Poor, such as exceeds 20,000 poly count, Quest/Android users won't be able to see the avatar without Show Avatar. Note that "Show Avatar" for Very Poor avatars may be removed in the future.
You may search for "Questtool" in Twitter or somewhere to find convenient tools that apply minimum required conversions and settings automatically. Please use the tools at your own risk.
Check the Official Guidelines
Before submitting, please make sure to review the Exhibition Guidelines and Submission Rules. For the submission steps, see the Submission Guide.
↑ Back to Top