Reverse Lookup List by Purpose
This page summarizes reference information by purpose for exhibiting.
Please also check the following pages:
Click here to expand
If you have been allocated a space exhibition slot, you can submit your entry using the following two methods:
*Vket Booth Maker cannot be used for Space Exhibition (Poppy Street).
- Unity Submission: Submission format using VRChat Creator Companion, Unity, and VketToolson a Windows PC.
This submission format offers a high degree of freedom and allows for the implementation of unique gimmicks using Udon, etc.
*Please note that VRM files and blend files cannot be imported directly.
- Web Submission: Submission format using Vket Booth Maker.
Vket Booth Maker is a service that allows you to create exhibits from a web browser. Compared to Unity submission, the work environment is much simpler, but submission rules are different.
*You will need to output your exhibit assets as GLB or VRM files before uploading.
Please also check the following pages:
Click here to expand
If you have been allocated an Item Exhibition slot, submit your entry using VRChat Creator Companion, Unity, and VketTools on a Windows PC.
Reference Link: Submission Guide (Item Exhibition)
Please also check the following page:
Click here to expand
If you have been allocated an avatar exhibition slot, submit your entry using VRChat Creator Companion, Unity, and VketTools on a Windows PC.
- Reference Link: Submission Guide (Avatar Exhibition)
- For submitting an Avatar Exhibition, Android Build Support Module must be installed in Unity.
- If you have installed Unity Hub or Unity using VRChat Creator Companion, this module is usually already installed. However, if you didn't use VRChat Creator Companion when installing Unity, you will need to install this module separately.
- Please refer to the Unity manual for how to install the Android Build Support Module.
- Reference Link: Android environment setup
*If you have installed this module after you have already created a Unity project, the module may not be recognized correctly. In that case, you may need to recreate the project, or uninstall Unity and reinstall Unity again from VRChat Creator Companion.
Please also check the following page:
Click here to expand
If VketTools checks are not working properly for your Avatar Exhibition, it is possible that the Android Build Support Module is not installed correctly.
- Please check if the Android Build Support Module is installed in the Unity environment you are using on Unity Hub. If it is not, please install it.
- If you installed Unity Hub or Unity using VRChat Creator Companion, this module is usually already installed. However, if you didn't use VRChat Creator Companion when installing Unity, you will need to install this module separately.
- Please refer to the Unity manual for how to install the Android Build Support Module.
- Reference Link: Android environment setup
*If you have installed this module after you have already created a Unity project, the module may not be recognized correctly.
In that case, you may need to recreate the project, or uninstall Unity and reinstall Unity again from VRChat Creator Companion.
Please also check the following pages:
Click here to expand
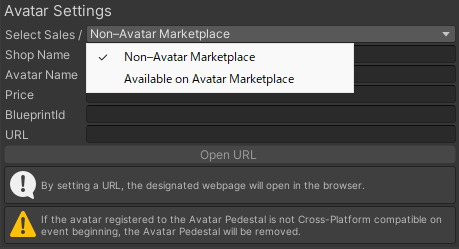
- If you are exhibiting an avatar sold on Avatar Marketplace, you will need to enter the Listing ID.
- If you are already selling avatars on the Avatar Marketplace, log in to the VRChat website, go to Marketplace > My Store > My Listings, and click the copy icon to copy the Listing ID.
- Selling avatars on the Avatar Marketplace requires approval from VRChat and other checks. Please refer to the following article for information on registering as a seller.
- If the Listing ID input field does not appear in VketTools during an Avatar Exhibition setup, it may be because “Non-Avatar Marketplace” is selected in the Select Sales / dropdown menu.
- To enable the Listing ID field, select “Available on Avatar Marketplace” from the Select Sales / dropdown menu in VketTools.
- If you are not selling your avatar on the Avatar Marketplace, you can enter the Blueprint ID of a sample avatar instead of the Listing ID.
- In VketTools, select "Non-Avatar Marketplace" from the dropdown menu under the Select Sales / field.
- Required input fields and available input fields vary depending on the selected sales or distribution type.
Please also check the following pages:
Click here to expand
To set up the working environment in Unity, you need to use VRChat Creator Companion (VCC) on a Windows PC to set up a Unity working environment for VRChat.
*Please be sure to use Unity 2022.3.22f1.
- Download and install VRChat Creator Companion from the VRChat web page, and follow the instructions of VRChat Creator Companion to install Unity Hub and Unity editor.
- Create a project using the Unity2022WorldProject template.
- Download VketTools and import it into the created project.
- If errors persist during the process, please check the version of VRChat Creator Companion and Unity is correct.
- Uninstalling Unity Hub and Unity, and then installing each tool according to the instructions of VRChat Creator Companion may resolve the error.
Please also check the following pages:
Click here to expand
To download VketTools, the following conditions must be met:
- You must be the owner of a circle that has already been accepted to exhibit at Vket.
- If other members of an accepted circle will be working on the project, the owner must share VketTools with them.
- It must be within the VketTools distribution period.
- VketTools is distributed during the Vket submission period.
Please also check the following pages:
Click here to expand
- Try closing and restarting Unity.
- If it still does not appear, please try the following:
- Close the VRChat SDK Control Panel, and then select VketTools > Show Control Panel from the Unity menu.
- Try re-importing VketTools.

Click here to expand
Starting from Vket2025 Winter, the installation method for certain shaders has been changed.
- When using UnlitWF Shader or lilToon, install their VPM packages in VCC. Please make sure the versions match.
- Please note that shaders that are not cross-platform compatible cannot be used for Avatar Exhibitions.
Click here to expand
Please do not update the files in the "VketShaderPack" folder.
*For some shaders, only specific versions are permitted.
Click here to expand
Please check the following:
- Click Build & Test from the VRChat SDK menu and check if VRChat launches properly.
If it does not launch, please check the following:
- In the Builder tab of the VRChat SDK, check that Build Type is set to
Build & Test Your World and the Clients value is set to 1. - In the Settings tab of the VRChat SDK, confirm that the
Installed Client Path is set correctly.
- If this field is empty, it may not function properly. Try clicking Revert to Default.
Click here to expand
When creating an exhibit as a circle or team:
- Only the owner of the Exhibitor Circle can download VketTools and submit the exhibit.
- Circle members may also create and check exhibition data in Unity. In that case, members can receive the VketTools from the owner.
- Members can easily share their changes by exporting a Unity Package using the “Export Submission Files” button at the bottom of VketTools.
- When creating exhibits with Vket Booth Maker, only the owner can create the exhibition data.
- If the exhibition is created by other members, the owner should receive the data from the member and upload the submission.
Please also check the following pages:
Click here to expand
Please check the following page:
Click here to expand
Please check the following page:
Click here to expand
Regardless of shapekey, animation, particles, or other gimmicks, please make sure not to exceed the limit defined in the Submission Rules.
Also, regardless of Mesh Bounds, the space must not visually exceed the space limit.
Click here to expand
If asset is set as redistribution prohibited, it cannot be used. Please check the terms of use for each asset.
For other prohibited items, please refer to the exhibition guidelines and terms and conditions:
Click here to expand
- It is your responsibility to use your own discretion after reviewing the guidelines and terms and conditions. We cannot answer individual questions.
- When exhibiting, make sure to read the Vket Event Exhibition Terms and Conditions, especially, 2. Items Prohibited From Exhibiting and 3.Representation and Warranty of Exhibit. Please also read VRChat guidelines such as Creator Guidelines, Community Guidelines, etc.
- Please also note that in the event of your exhibition being canceled or removed due to terms violation, the exhibition fee will not be refunded.
- Furthermore, an item being on display does not guarantee that it complies with the exhibition guidelines or the platform's terms of service.
- Restrictions under the terms of service are determined on a case-by-case basis by the Vket staff and the hosting platform. There have been cases where items were denied placement, removed, or required replacement in accordance with the exhibition guidelines and terms, such as in the following cases:
- Items implying child pornography
- Items implying child prostitution
- Items not appropriate for 13 years old players, the minimum age eligible for VRChat usage
- Items with the primary objective of advertisement and inducement for services operated by corporate entities not directly related to the Virtual Market or the event platform
- Items that promote or advertise NFT or blockchain technology
- Intense visual effects that may negatively impact the physical health of visitors (e.g., flashing screens)
*Avatars set on avatar pedestals must also comply with the guidelines.
Click here to expand
- We, as the event organizer, cannot make judgments on fan-created derivative works, regardless of the existence fan-creation guidelines.
In principle, exhibitors are responsible for following the original copyright owner's guidelines.
Vket does not guarantee exhibits comply with the exhibition guidelines, the terms of the hosting platform, or any other right-related guidelines.
Furthermore, if Vket receives a request from the copyright holder or other rights holder, the exhibit may be removed.
Click here to expand
Click here to expand
There are two size limits for the exhibit.
- A. Total file size of the submission folder
- B. Build size of the AssetBundle
A is the file size displayed when you open the exhibitor ID folder in Explorer, right-click, and select Properties.
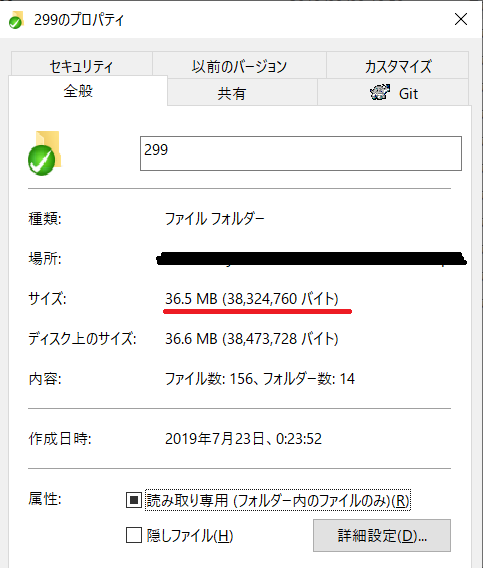
Check the following points to reduce the file size.
- Typically, files with larger sizes fall into one of the following three categories:
- Texture files
- FBX files
- .asset files of meshes created with tools like MeshBaker
- Move unused files out of the folder or delete them.
- If the texture file is a PSD file, export it into PNG format.
- If the "Max Size" of the texture file is smaller than its actual size, you can resize it using paint software, etc.
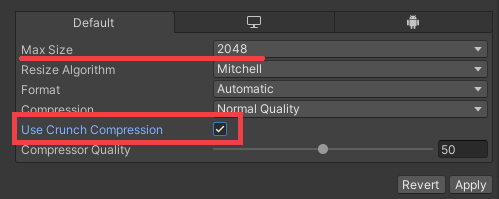
B, the build size of the AssetBundle, is the file size that will be displayed when you run "Build Size Check" in the submission tool.
In most cases, texture files are a large part of the file size. You can reduce the build size by selecting a texture file and reducing the "Max Size", or by checking "Use Crunch Compression".
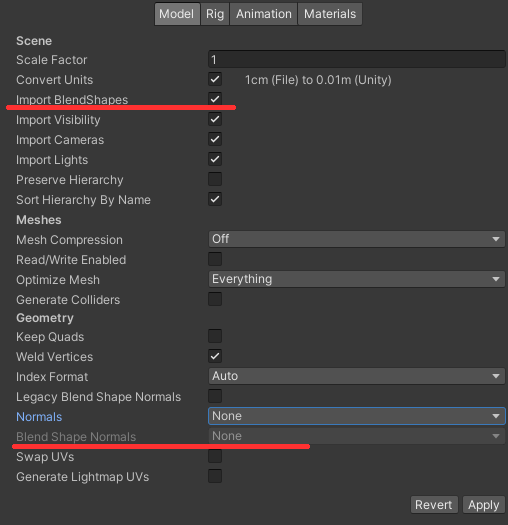
If you import an FBX file with a lot of shapekeys, such as an avatar, the build size may be very large if Blend Shape Normals is set to Calculate. If you are not using Blend Shapes, you can uncheck Import BlendShapes.
Please also check the following pages:
Click here to expand
Please check the following pages:
Click here to expand
Please check the following page:
Click here to expand
For some shaders, when you set them to Batching Static or Lightmap Static, their appearance may not be reflected as intended. Please check how it looks in the Preview World and adjust the settings as necessary.
Click here to expand
CyanTrigger cannot be submitted in its original "Cyan Trigger" component form.
You need to convert the Cyan Trigger component into the "CyanTriggerAsset" component.
The conversion process is as follows:
- To convert into the "CyanTriggerAsset" component, in the Utilities menu at the bottom of the "CyanTrigger" component, click "Convert to CyanTriggerAsset."
- From the Unity menu, run VketTools > MoveSerializedUdonPrograms to move the script files into the submission folder for your circle ID.
If a dialog named ExportCyanTrigger appears during the conversion process, please click the "VariablePerReference" button in the center.
We strongly recommend creating a backup of your project before performing these steps.
Click here to expand
The method for exhibiting avatars differs depending on the exhibition format.
Additionally, the setup process varies depending on whether you are simply displaying a 3D model or setting up an Avatar Pedestal to allow visitors to try on the avatar.
*If you wish to set up an Avatar Pedestal, you will need the Blueprint ID of an VRChat avatar with public settings.
(It is acceptable to switch to public settings only for the duration of the event.)
- For Space Exhibitions using Unity Upload:
- To simply display a 3D model, you can exhibit it by placing the avatar's 3D model in the scene.
- To set up an Avatar Pedestal, you can use the VketAvatarPedestal Prefab from the official Vket assets and specify the Blueprint ID.
*You can place VketAvatarPedestals in your scene via VketTools.
- For Space Exhibitions using Web / Vket Booth Maker Upload:
- To simply display a 3D model, you can exhibit it by uploading a 3D model converted to a GLB file to Vket Booth Maker and placing it from your warehouse.
- To set up an Avatar Pedestal, upload an avatar converted to a VRM file to Vket Booth Maker, perform Character Placement, and specify the Blueprint ID via the VketAvatar Pedestal button. This will create an Avatar Pedestal.
*Only one avatar can be placed per exhibition. Even if you do not set a Blueprint ID, the VRM model will still be placed.
- For Item Exhibitions:
- To simply display a 3D model, you can exhibit it by placing the avatar's 3D model in the scene.
- To set up an Avatar Pedestal, set the Select Item Type in VketTools to Avatar and specify the Blueprint ID. The exhibit will then become an Avatar Pedestal. *Only one Blueprint ID can be allocated. Pedestal cannot be used with Pickup.
- For Avatar Exhibitions:
- Please note that the rules and restrictions for Avatar Exhibition at Vket 2026 Summer are significantly different from those of Vket2025 Summer.
- Exhibitors are required to submit a Unity Humanoid model.
- Non-Humanoid avatars or 3D models that are not avatars cannot be exhibited.
- Reference Link: Submission Guide (Avatar Exhibition)
Please also check the following pages:
- Space Exhibition
- Item Exhibition
- Avatar Exhibition
- Other Related Topics
Click here to expand
Whether you can exhibit a model that can be held in hand depends on the exhibition format and submission method.
- For Space Exhibitions using Unity Upload:
- You can place models that can be picked up by using the VketPickup from the official Vket assets.
- By using the VketFollowPickup from the official Vket assets, you can place models that can be worn by following a specific bone after being picked up.
- *Both can be placed in your scene via VketTools.
- For Space Exhibitions using Web / Vket Booth Maker Upload:
- When submitting via Vket Booth Maker, you can exhibit models that can be held by turning ON "Can be held" in the settings of the placed furniture.
- For Item Exhibitions:
- You can set the entire exhibit to be Pickup-enabled by setting Select Item Type in VketTools to Pickup. *Pickups cannot be used in conjunction with Avatar Pedestals.
- For Avatar Exhibitions:
- Unfortunately, Pickup settings cannot be applied for Avatar Exhibitions.
Click here to expand
You can exhibit wearable models if you are doing a Space Exhibition using Unity Upload.
*Other exhibition formats and submission methods do not allow exhibiting wearable models.
- For Space Exhibitions using Unity Upload:
- By using the VketFollowPickup from the official Vket assets, you can place wearable models that follows specific bones.
- Reference Link: VketFollowPickup (Prefab)
- By using the VketAttachItem from the official Vket assets, you can place wearable models with an added UI that allows you to adjust the attachment position using a slider.
- Reference Link: VketAttachItem (Prefab)
- *Both can be placed in your scene via VketTools.
Click here to expand
The method for exhibiting images differs depending on the exhibition format and submission method.
- For Space Exhibitions using Unity Upload:
- You can place images using various Unity features. The main methods are as follows:
- Place the image by assigning it as a texture to the material of a Quad or other polygon. *Please be aware of the front and back faces of the polygon.
- Place it using the Canvas UI component.
- Use VketImageDownloader to load images from a specific URL. *This is an advanced feature. It may not display correctly depending on the upload location.
- For Space Exhibitions using Web / Vket Booth Maker Upload:
- When working with Vket Booth Maker, there are mainly two ways to place images:
- For Item Exhibitions:
- If you want to exhibit images in Item Exhibitions, please place them in the form of a 3D model, such as by assigning the image as a texture to the material of a Quad.
*UI components and VketImageDownloader cannot be used in Item Exhibitions.
- Images to be displayed on the caption board can be specified via VketTools.
- For Avatar Exhibitions:
- If you want to display an image in an Avatar Exhibition, place it as part of the avatar. (For example, by applying the image as a texture to a material).
- *UI components and VketImageDownloader cannot be used in Avatar Exhibitions.
Please also check the following pages:
- Space Exhibitions
- Item Exhibitions
- Avatar Exhibitions
Click here to expand
If you have a Space Exhibition, you can place and play videos.
*Video placement and playback are not possible in other exhibition formats.
- For Space Exhibitions using Unity Upload:
- You can place videos by using the VketVideoPlayer from the official Vket assets.
- You can also switch the URL set in VketVideoPlayer by using it in combination with the VketVideoUrlTrigger, an official Vket asset.
- *Both can be placed in your scene via VketTools.
- For Space Exhibitions using Web / Vket Booth Maker Upload:
- When working with Vket Booth Maker, you can play videos by placing furniture with a video upload function from the warehouse.
- *Only one video can be placed.
Please also check the following pages:
Click here to expand
If you are doing a Space Exhibition using Unity Upload, you can place chairs that people can sit on.
*Placing chairs that people can sit on is not possible with other exhibition formats or submission methods.
For Space Exhibitions using Unity Upload:
- By using the VketChair from the official Vket assets, you can place standard chairs.
- By using the VketFittingChair from the official Vket assets, you can place chairs where the height is automatically adjusted when someone sits down.
- *Both can be placed in your scene via VketTools.
*Placing chairs is not possible with other exhibition formats or submission methods.
Click here to expand
If you are doing a Space Exhibition using Unity Upload, you can place mirrors by using the official Vket asset VketMirror.
*Can be placed in your scene via VketTools.
*Placing mirrors is not possible with other exhibition formats or submission methods.
Click here to expand
If you are doing a Space Exhibition using Unity Upload, you can place a switch to toggle the language display of your exhibit by using the official Vket asset VketLanguageSwitcher.
- Objects toggled by this switch will also automatically switch when the world language is changed.
*Can be placed in your scene via VketTools. - Reference Link: VketLanguageSwitcher (Prefab)
*Placing a switch to toggle between Japanese and English display is not possible with other exhibition formats or submission methods.
Click here to expand
If you are doing a Space Exhibition using Unity Upload, you can easily implement gimmicks that activate when an object is interacted with by using the Vket Interact Trigger, an Udon script provided by Vket.
*You can add Vket Interact Trigger by adding the Udon Behaviour component to the object you want to have interaction detection, and then selecting it from the dropdown menu.
- For more complex gimmicks, please utilize Cyantrigger or your own custom-made Udon scripts.
*Vket Interact Trigger cannot be used with other exhibition formats or submission methods.
Click here to expand
If you are doing a Space Exhibition using Unity Upload, you can easily implement gimmicks that activate when someone enters the exhibition space by using the Vket OnBooth Trigger, an Udon script provided by Vket.
*You can add Vket OnBooth Trigger by adding the Udon Behaviour component to an empty object and then selecting it from the dropdown menu.
*Vket OnBooth Trigger cannot be used with other exhibition formats or submission methods.
Click here to expand
The method for setting up links to e-commerce sites that sell products varies depending on the exhibition format and submission method.
There are restrictions on e-commerce site addresses that can be specified as links for each method.
- For Space Exhibitions using Unity Upload:
- You can set up links to e-commerce sites by using VketURLOpener.
- You can also set up links to the circle catalog page by using VketCirclePageOpener. By registering products in the circle catalog, you can direct users to an e-commerce site.
- *Both can be placed in your scene via VketTools.
- For Space Exhibitions using Web Upload:
- When uploading from Vket Booth Maker, you can set up links to the circle catalog page by using "price tag items." By registering products in the circle catalog, you can direct users to an e-commerce site.
- For Item Exhibitions:
- You can only set one URL to an e-commerce site by specifying the URL on VketTools.
- If you do not specify a URL, it will link to the circle catalog. By registering products in the circle catalog, you can direct users to an e-commerce site.
- For Avatar Exhibitions:
- If your avatar is sold on the Avatar Marketplace, entering its Listing ID in VketTools will automatically generate a button that opens the corresponding product page on the Avatar Marketplace.
- If your avatar is not sold on the Avatar Marketplace, you can specify one e-commerce site URL directly in VketTools to create a link to it.
- In addition, you can direct users to e-commerce sites by displaying URLs as images on the exhibits or by placing QR code images.
Click here to expand
The method for setting up links to e-commerce sites that sell products varies depending on the exhibition method and format.
- For Space Exhibitions using Unity Upload:
You can set up links to the circle catalog page by using VketCirclePageOpener. By registering products in the circle catalog, you can direct users to an e-commerce site.
*Can be placed in your scene via VketTools. - For Space Exhibitions using Web Upload:
- When uploading from Vket Booth Maker, you can set up links to the circle catalog page by using "price tag items." By registering products in the circle catalog, you can direct users to an e-commerce site.
- For Item Exhibitions:
- If you do not set a URL to an e-commerce site on VketTools, it will link to the circle catalog. By registering products in the circle catalog, you can direct users to an e-commerce site.
- For Avatar Exhibitions:
- If you do not specify a URL to an e-commerce site on VketTools, it will link to the circle catalog. By registering products in the circle catalog, you can direct users to an e-commerce site.
Click here to expand
If you have a Space Exhibition, you can set up a link to a VRChat group page.
*Setting up links to VRChat group pages is not possible with other exhibition formats.
- For Space Exhibitions using Unity Upload:
You can set up a link to a VRChat group page by using VketGroupPageOpener.
*Can be placed in your scene via VketTools.
- For Space Exhibitions using Web Upload:
- When uploading from Vket Booth Maker, you can set up a link to a VRChat group page by specifying the URL from the group ID button on the "Group Tag" item.
Click here to expand
If you are doing a Space Exhibition using Unity Upload, you can load images from external services by using the official Vket Prefab VketImageDownloader.
Please note that this is an advanced feature as the external services have their own specifications.
*Can be placed in your scene via VketTools.
Click here to expand
If you are doing a Space Exhibition using Unity Upload, you can load strings from external services by using the official Vket Prefab VketStringDownloader.
Please note that this is an advanced feature as the external services have their own specifications.
*Can be placed in your scene via VketTools.
Click here to expand
Please check the following pages:
Click here to expand
Please check the following page:
Click here to expand
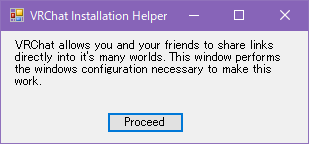
It is possible that VRChat is not set up to launch from vrchat:// links. You can enable this by clicking Proceed in the dialog box shown below, which appears when you exit VRChat.
Click here to expand
- Please verify that the Blueprint ID set in the Avatar Pedestal is correct.
- Additionally, make sure the avatar is set to public.
- The booth location is (0,0,0) in the local test, but in the Preview World, booths are moved to their respective placement locations, which may cause the pedestal's collision detection to be displaced.
- When adjusting the Interact position, leave the Center of the CapsuleCollider as (0,0,0) and move the Transform of VketAvatarPedestal_3D.
Click here to expand
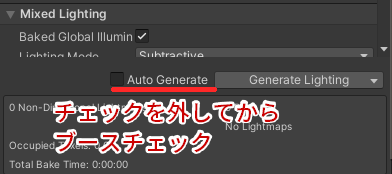
- This message appears when the light bake is not successful.
- It seems that if Auto Generate is checked in the Lightmapping Settings of the Lighting tab, the bake startup from VketTools is rejected and this message appears.
- Please check if Auto Generate is checked. If it is, uncheck it and try again.
Click here to expand
This error occurs if there are 2-byte characters (such as Japanese) in the project folder or the path leading to it. Check that all folders up to the one containing the Unity project are named with single-byte alphanumeric characters and symbols only.
- Example of error:
C:\Users\Vケットちゃん1号\プロジェクト\ - Example of OK:
C:\Vket2026S\Project1\
Click here to expand
If you receive an error like the one below, it means materials bundled within the FBX file are being used.

Select the FBX file and check the Inspector.
If the Extract Materials button is clickable as shown below, it means the materials included inside the FBX file are currently being used.
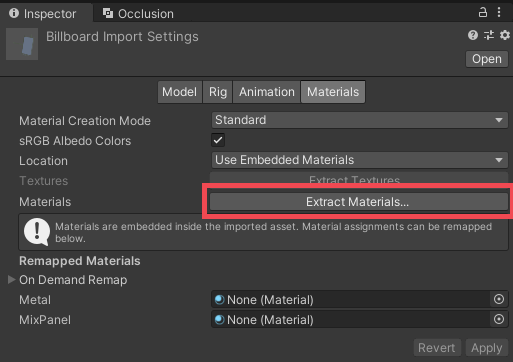
Press the Extract Materials button to extract the bundled materials into the project folder and use them.
It should be fine if materials are set in the On Demand Remap section like below.
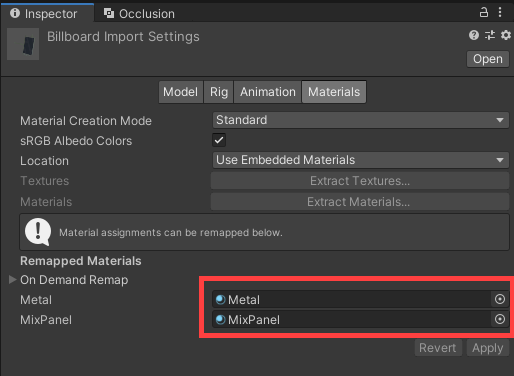
Alternatively, you can avoid using the bundled materials by assigning your own materials to the On Demand Remap section without extracting materials.
Click here to expand
This can occur in cases such as the following:
- The official Prefab has been unpacked (broken)
- To resolve this, please place the official Prefab in your scene again.
- The official Prefab is copied and used in the submission folder
- Please use official Prefabs generated in the Hierarchy from VketTools operations.

