← Back to Technical Guides
Lighting Guide for Exhibitors
This document provides general information about lighting in submission data for Vket exhibitors. For specific lighting settings in each world, please check the World Lighting Reference Values.
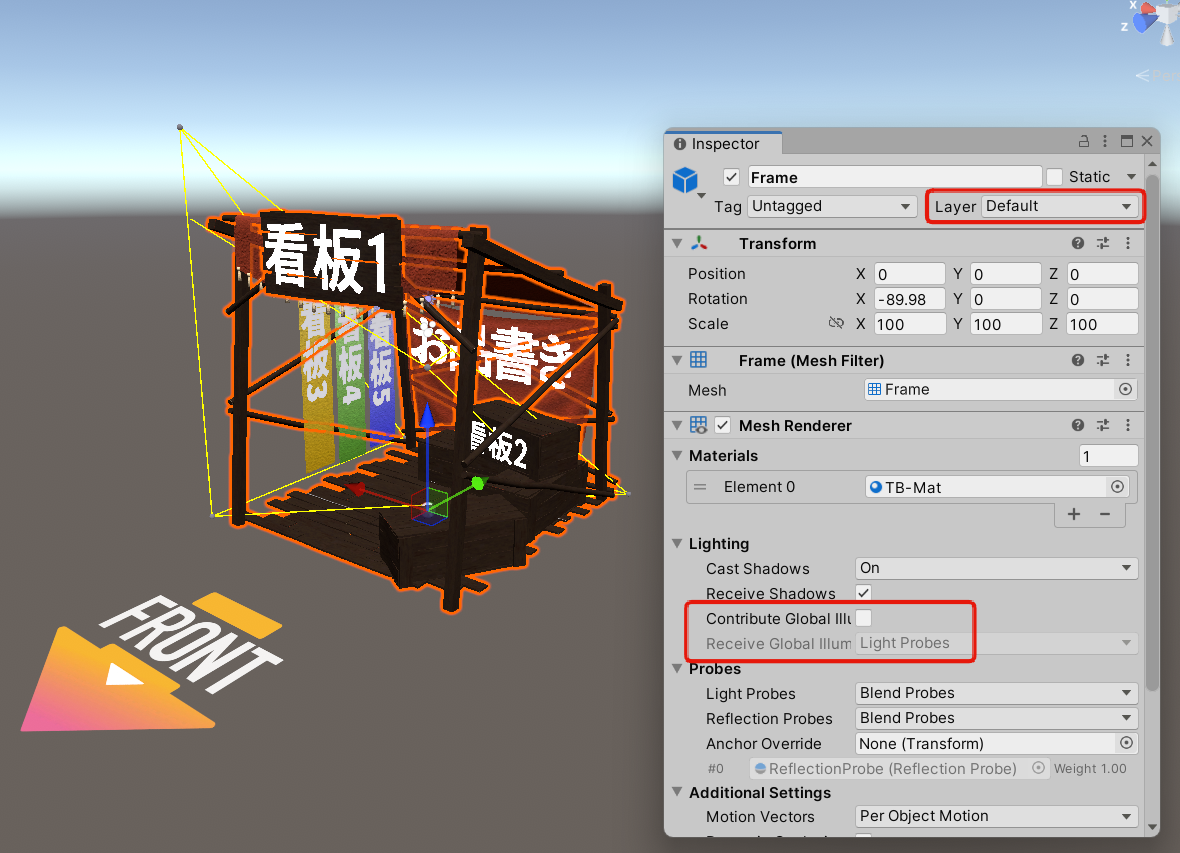
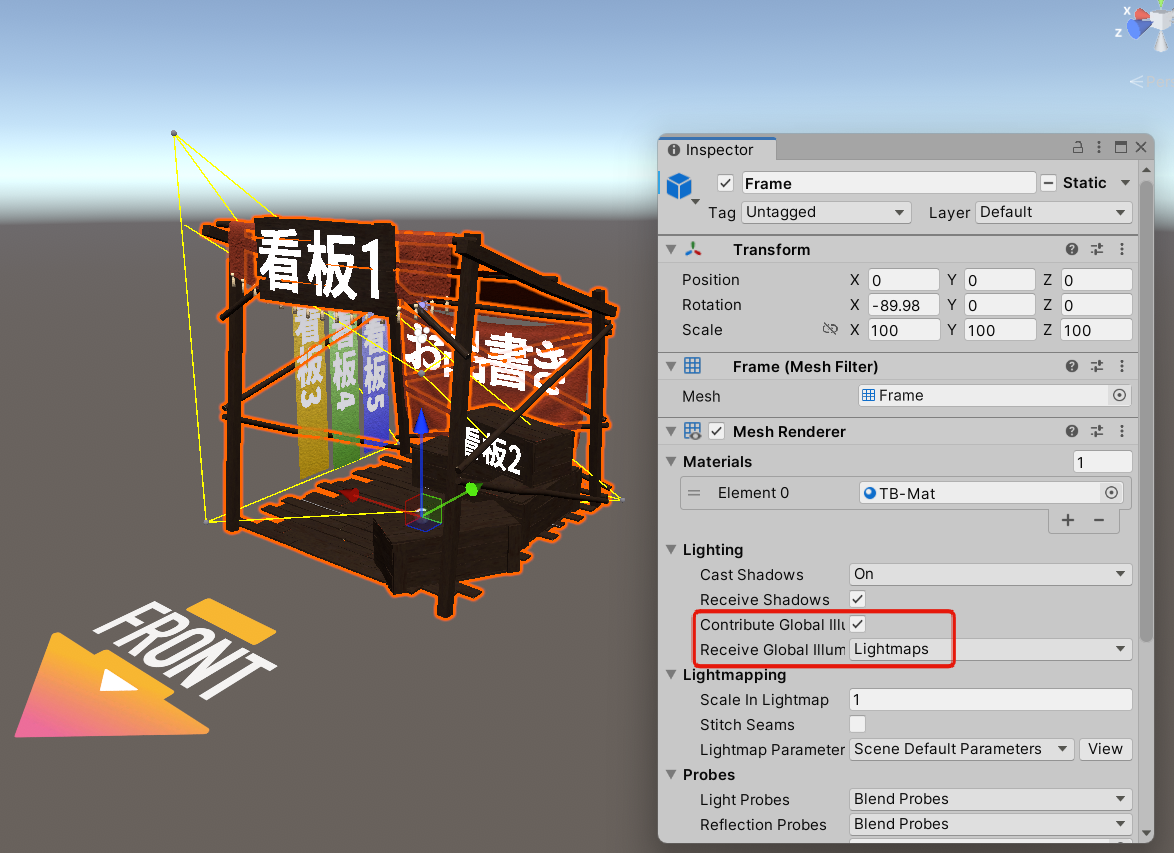
- In general, the Default layer is sufficient.
- For baking, Contribute GI should be ON.
- The Environment layer is recommended.
- Check the final brightness is OK in the Preview World.
- Brightness issues can usually be resolved by changing the layer.
- For common issues, refer to the Troubleshooting section of this document.
As stated at the end of the Submission Rules, global lights and other elements are already placed in the world. The worlds are designed to be visitor-ready even without having specific lighting settings in your submission data.
- Basic lighting is already set.
- Player Directional Light: Real-time Directional Light for the player.
- Ambient Light: Ambient light (equivalent to a Baked/NoShadow Directional Light).
- Other additional Baked lights (to ensure brightness in the exhibition area).
- Real-time shadows are not available.
- CameraDepthTexture is generated on the world side.
- Reflection Probe and PostProcessingVolume (Bloom) are set up in the exhibition area.
- Light Probes are set up around the exhibits.
The Player Directional Light illuminates the Default layer but not the Environment layer. The Default layer appears brighter because real-time light is added to the baked result. The Environment layer is not affected by real-time light, so its appearance remains stable based solely on the baked result.
Since CameraDepthTexture is generated on the world side, water shaders and other effects that utilize CameraDepthTexture can be used.
The submission scene follows the same world light settings as above with the following differences.
- The color and intensity of lights in the submission scene are set to general values and differ from the actual world.
- Submission data will be moved and rotated from the scene origin when placed.
- The position and number of Light Probes around the exhibits may differ.
- CameraDepthTexture is not generated.
- Since there is no world mesh in the submission scene, indirect light cannot be reflected. The same applies to the Reflection Probe.
- Light baking is done before world upload. The light baking result on the submission scene will not be shown in the actual world.
Therefore, please check the resulting appearance in the Preview World after submission.
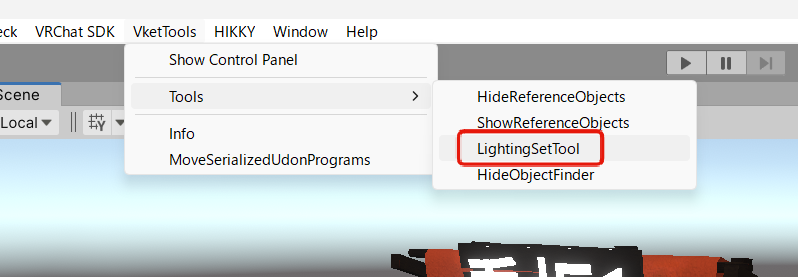
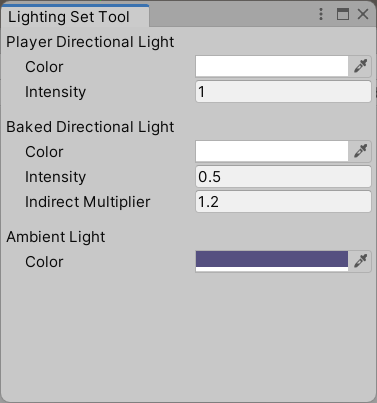
Directional Lights and the like are hidden objects in the submission scene. You can configure them via the window opened from the Unity Editor menu: VketTools -> Tools -> LightingSetTool. To set the values, please refer to the World Lighting Reference Values.
In Unity, the default settings for MeshRenderer and SkinnedMeshRenderer are "Contribute GI OFF" and "Default Layer".
In these settings, both the real-time light from the Player Directional Light and the baked light from the Light Probes will be applied, resulting in a brighter render.
MeshRenderers with "Contribute GI" will have light baking.
In Vket, after the data submitted by each exhibitor is placed in the world, light baking occurs immediately before the upload. The light baking on the submission scene is not uploaded to the world. Instead, light baking is done at the time of submission as a prerequisite for various submission checks.
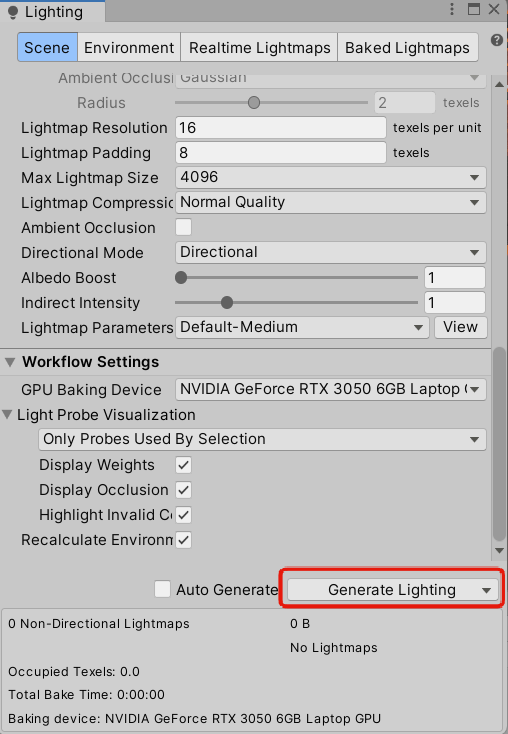
Additionally, you can perform light baking as needed during the creation of your submission data to check the results. To manually run light baking, in the Unity menu Window -> Rendering -> Lighting Settings, use the Generate Lighting button at the bottom of the menu.
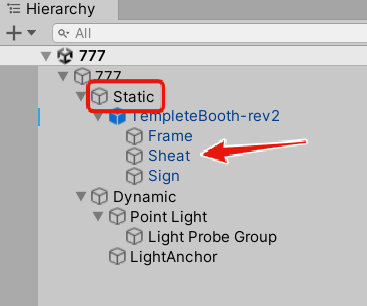
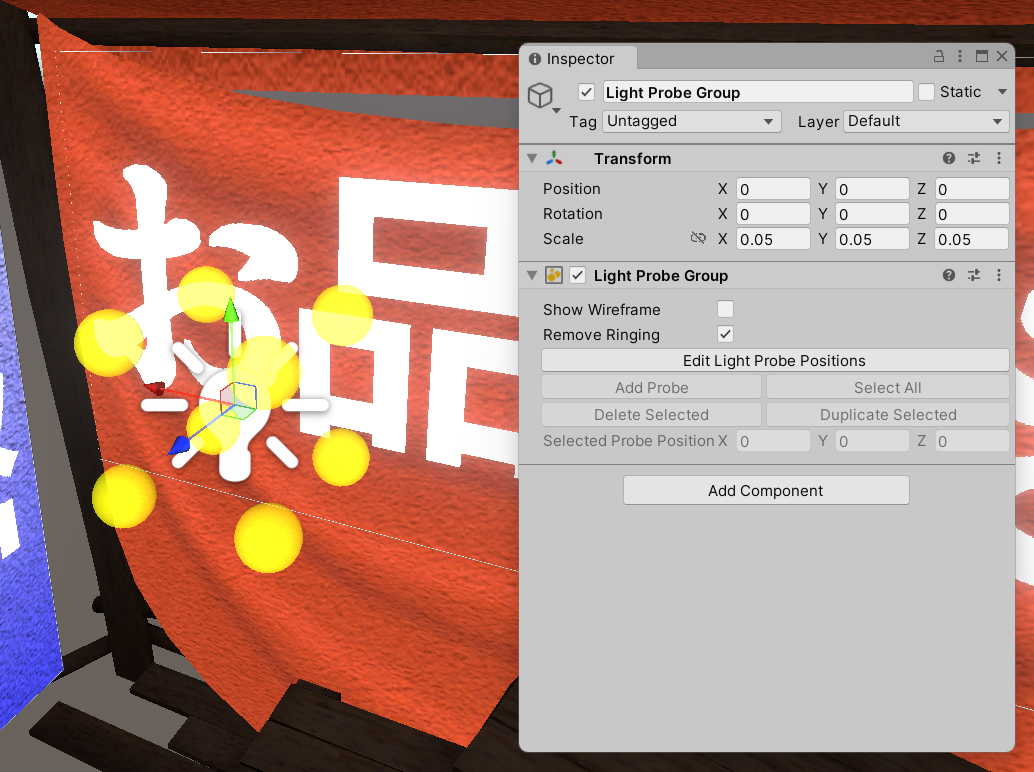
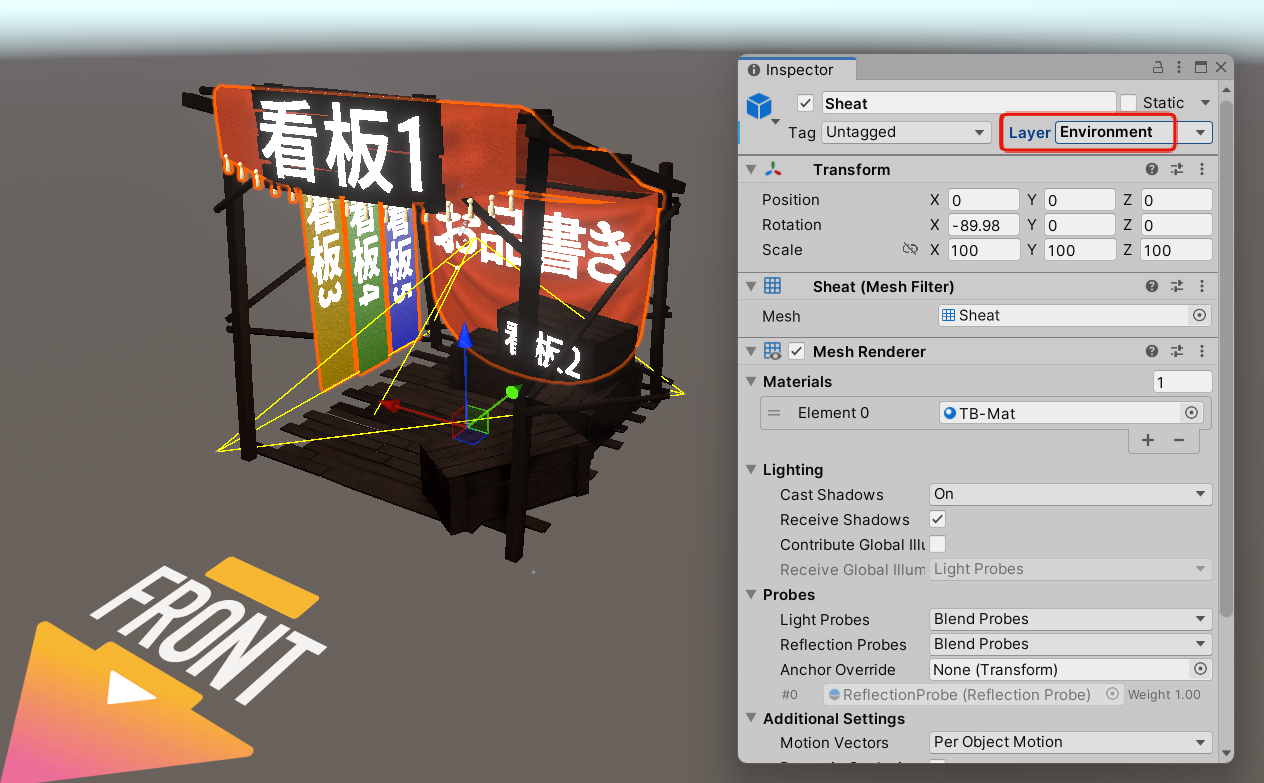
Objects containing MeshRenderers with Contribute GI turned ON should be moved under Static in the submission scene hierarchy.
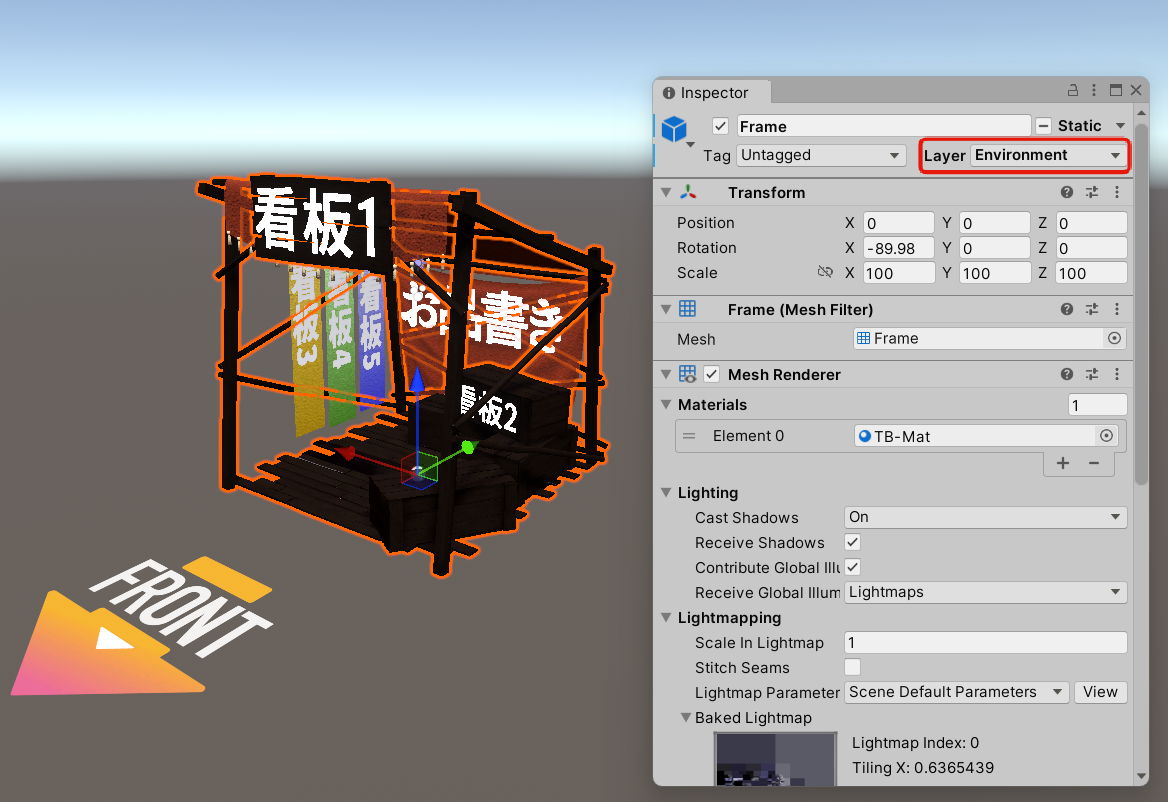
It is also recommended to change the layer from Default to Environment. Since the Environment layer is not illuminated by real-time light, the baked result is rendered directly.
You can add Baked lights to the hierarchy for use in light baking. Although there are restrictions on the available settings, you can add Point/Spot/Area lights with SoftShadow or HardShadow. For details, please refer to the Submission Rules.
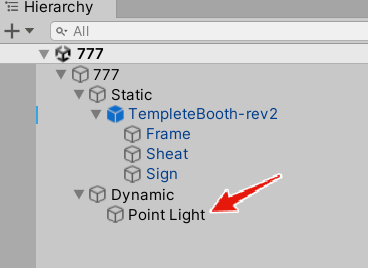
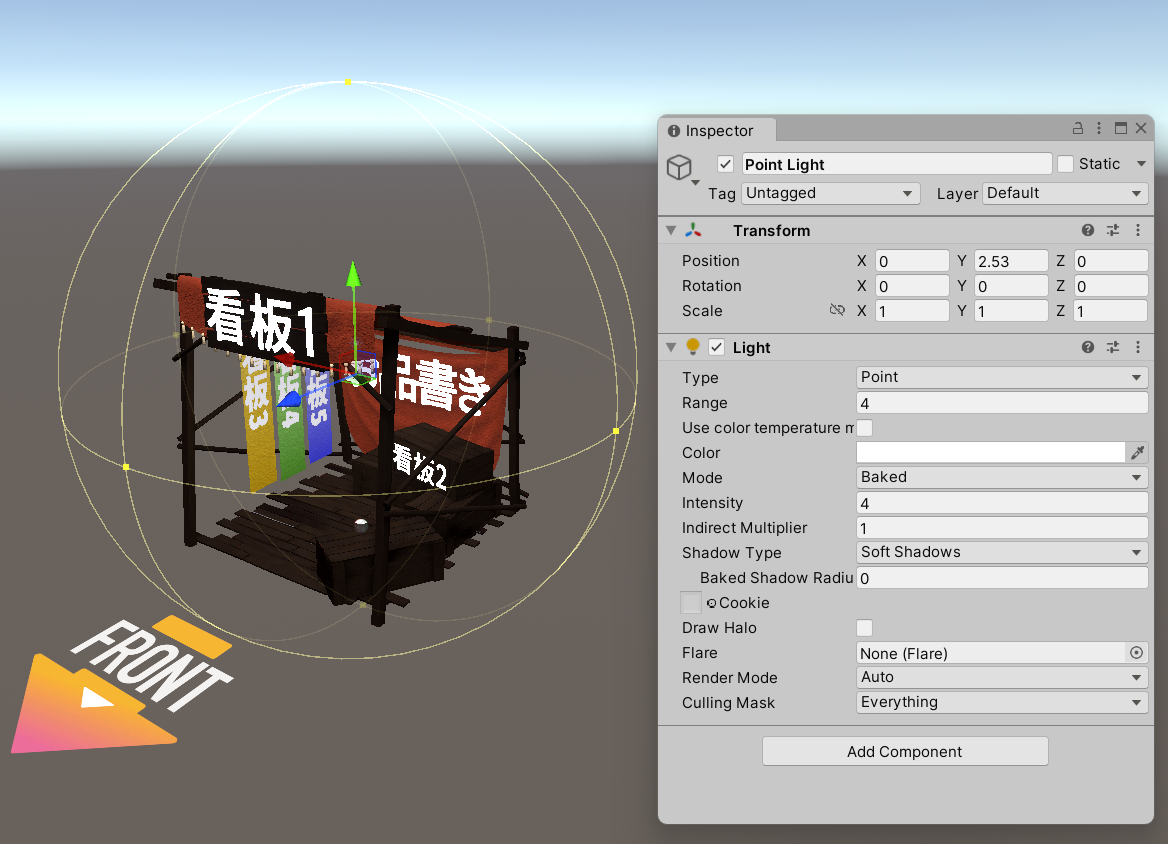
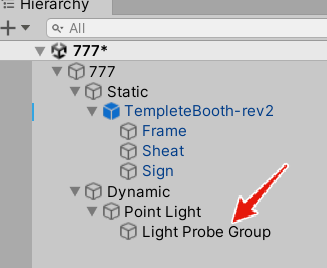
If you add lights, it is also recommended to add a LightProbeGroup to illuminate dynamic meshes (meshes with Contribute GI OFF).
This section contains common lighting issues and possible solutions.
This occurs when the mesh does not receive enough light.
While this may be due to insufficient lighting on the world side, adjustments are difficult after other exhibitors' data is submitted. Please consult us as soon as possible if you have any concerns.
The Player Directional Light does not affect the Environment layer. If the Environment layer is too dark, you can change to the Default layer to adjust the brightness.
For Space Exhibitions, you can add Baked lights to your submission. Adding Baked lights ensures sufficient brightness for meshes baked into the lightmap. Furthermore, by adding a LightProbeGroup around the Baked lights, you can also ensure the brightness of dynamic meshes that receive light from Light Probes.
Consider also adjusting the material settings. You can boost brightness by adding a weak Emission or increasing the Unlit Intensity.
This occurs when the mesh receives an excessive amount of light, this is the opposite to being too dark.
While this may be due to the lighting on the world side being too strong, adjustments are difficult after other exhibitors' data is submitted. Please consult us as soon as possible if you have any concerns.
The Default layer is illuminated by Player Directional Light. If an object is too bright in the Default layer, you can change it to the Environment layer to make it darker.
If any Baked lights you added are too bright, please adjust them.
Consider adjusting the material settings. If the material color is set to white (255, 255, 255), you can tone it down by adjusting it to a light gray.
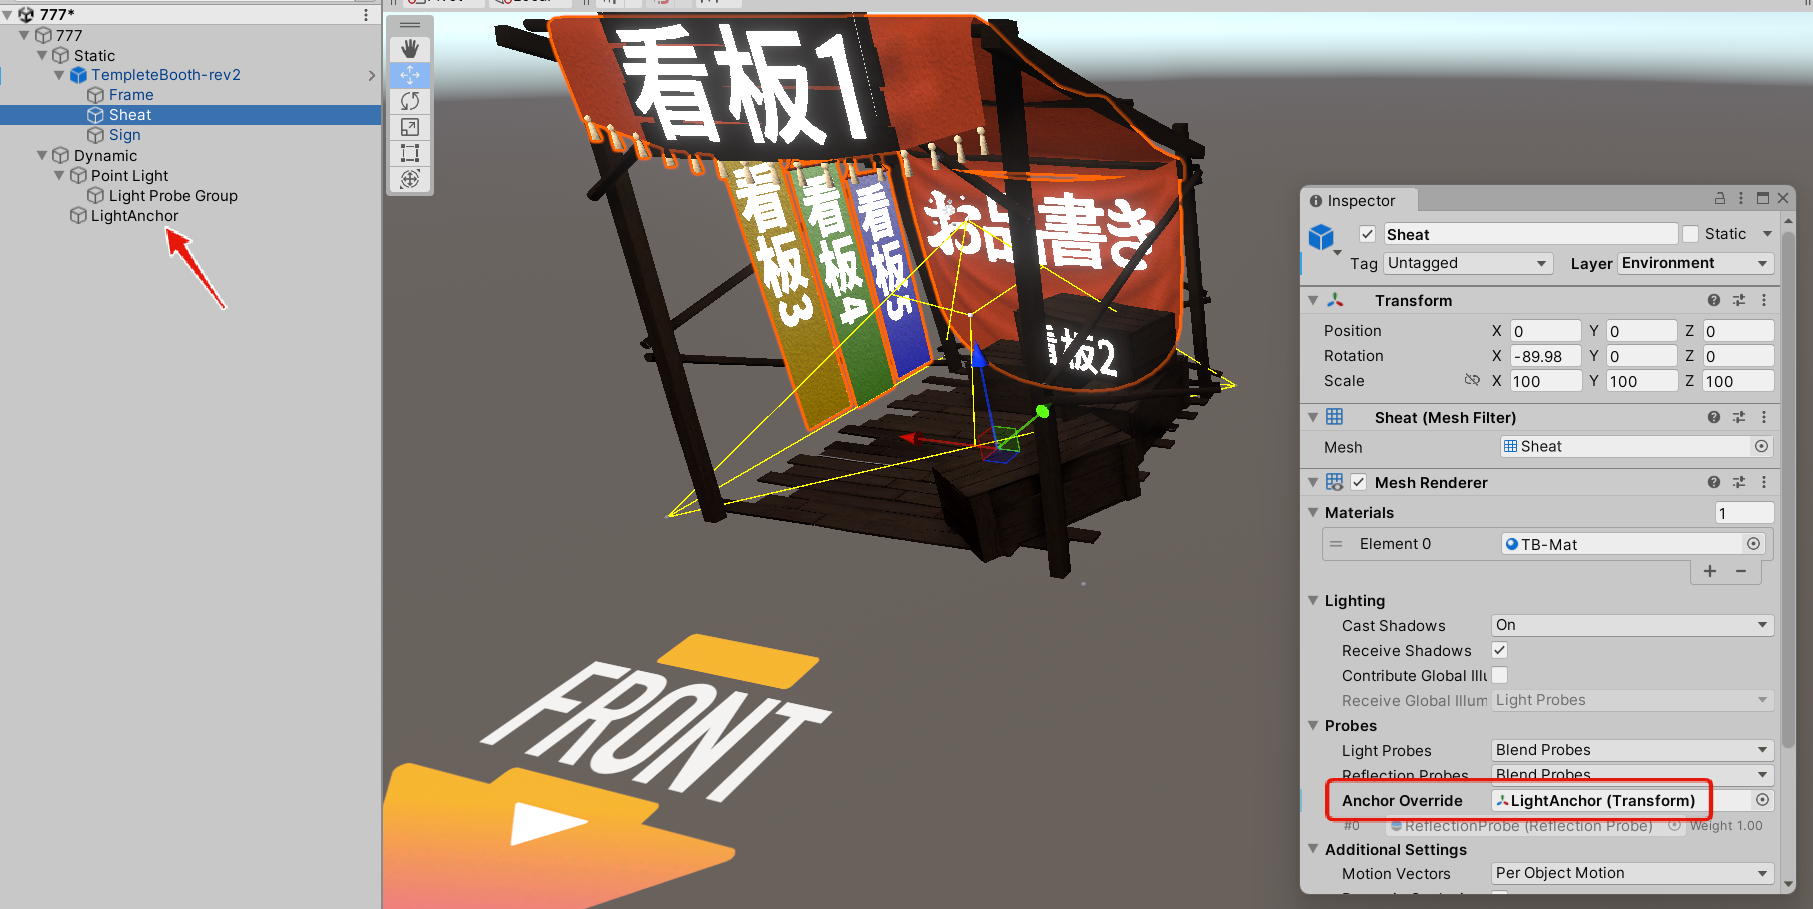
It is recommended to set a common Transform for the Anchor Override on meshes.
While Anchor Override is often used to unify the brightness of avatars, they are equally effective for unifying the brightness of meshes placed in the world.
If the brightness does not match between meshes with Contribute GI ON and OFF, especially when Baked lights have been added, check if Light Probes are set up around the Baked lights. If Contribute GI is OFF, the mesh can only reference light from Baked lights via Light Probes. This can cause brightness inconsistency between meshes.
Ensure at least one Light Probe is near the light. Simply creating a LightProbeGroup at the same position as the light, and scaling it down so its probes surround the light, is sufficient.
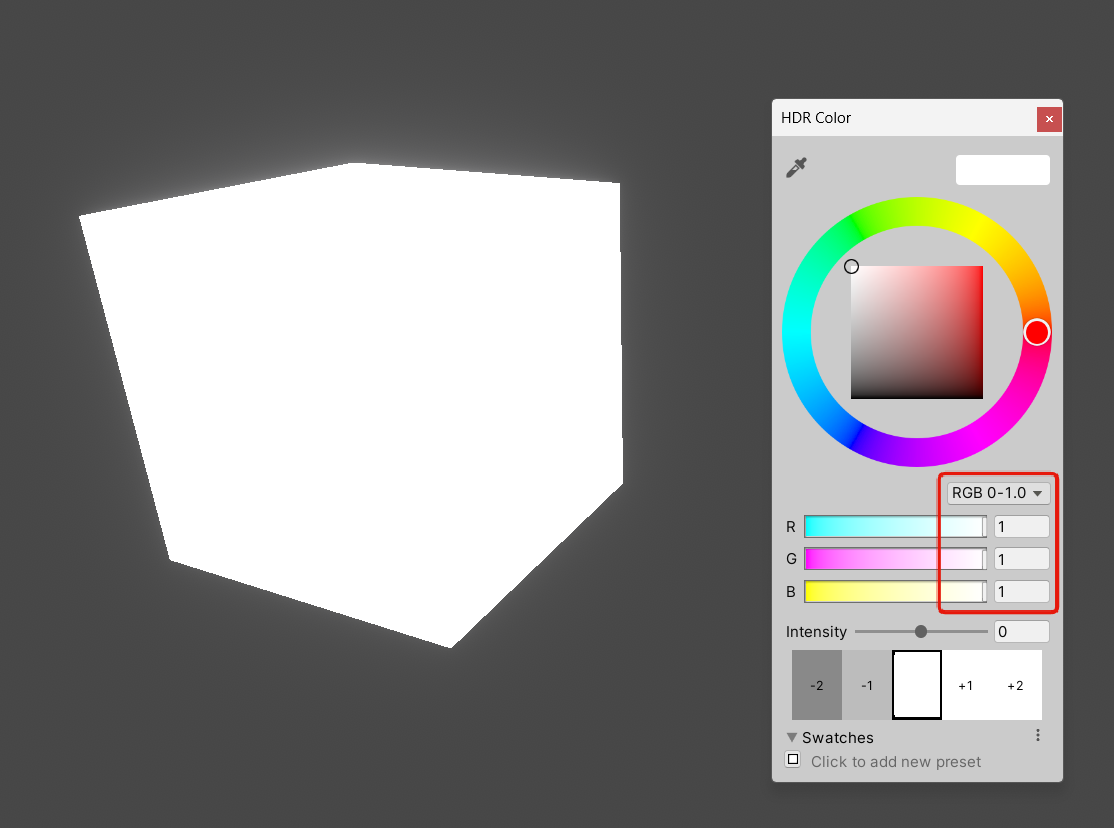
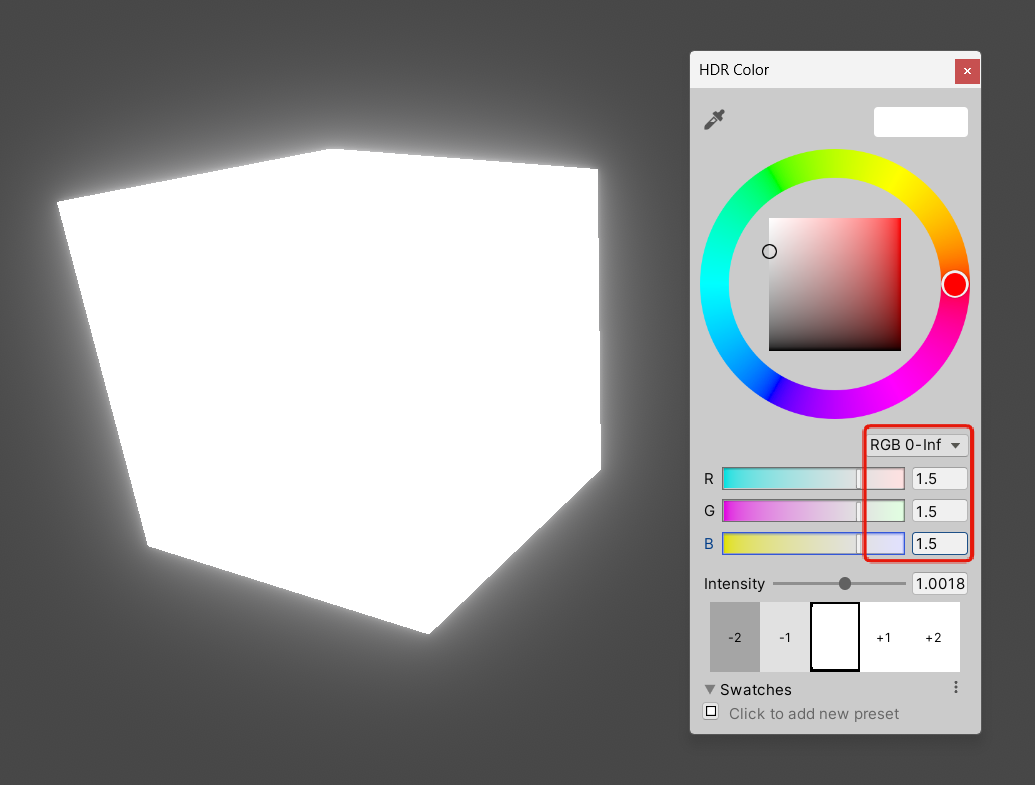
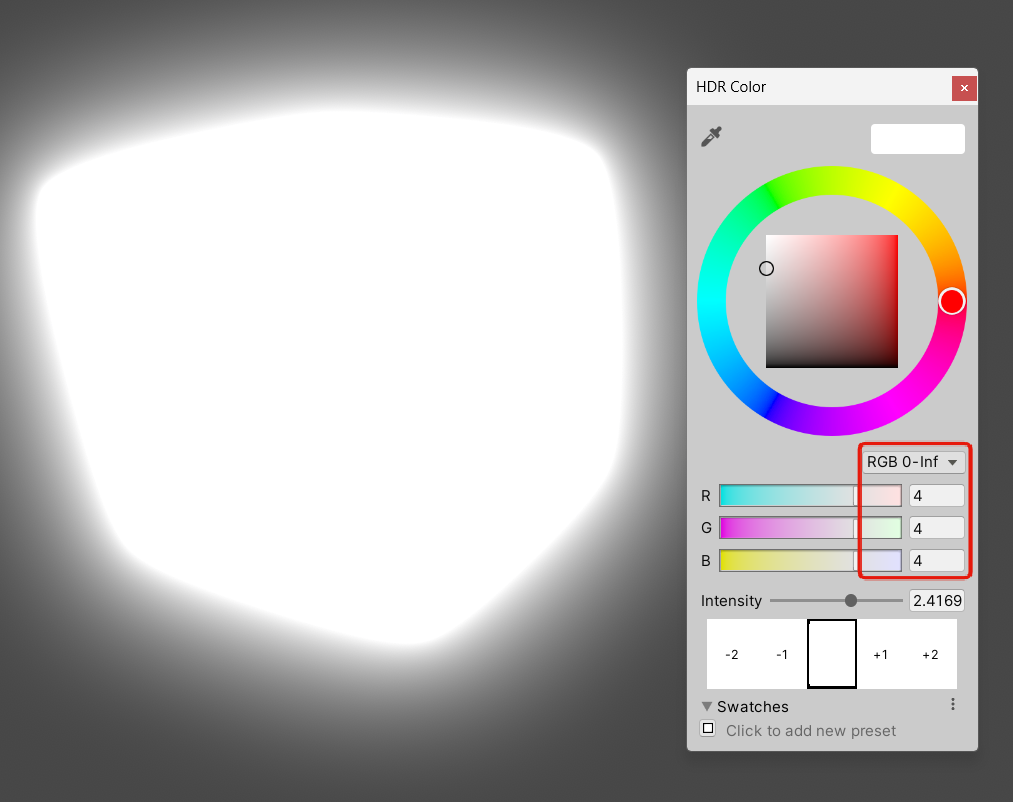
Compare the Emission settings of your Bloom materials with the World Lighting Reference Values. If it doesn't glow, the Emission intensity of the material might not meet the Bloom.Threshold. If it glows too much, the Emission intensity might be too high.
For the Standard shader, a reasonable range for the Emission Intensity is 1.5 to 4.0 (expressed as RGB 0-1.0 or RGB 0-Inf). Besides the Standard shader, other shaders may require higher values.
Weak Bloom effects can be hard to distinguish. It is recommended to check the Bloom against a black Unlit mesh as a background.
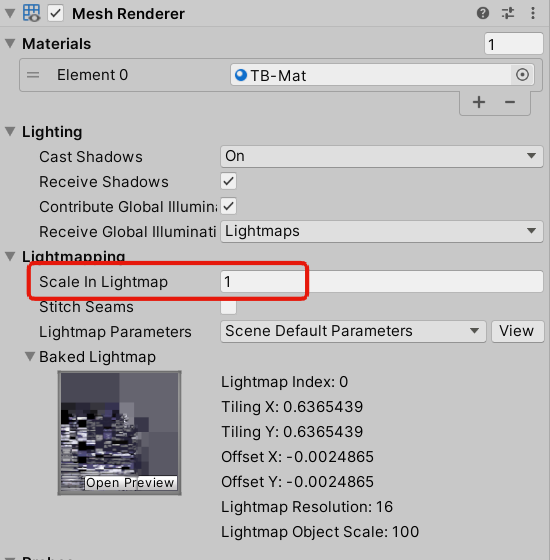
For a standard Space Exhibition (4m wide x 4m deep x 5m high), the bake time should be within 5 minutes, and the lightmap should fit within 512 x 512 pixels. If more than the aforementioned, the Scale In Lightmap value on the MeshRenderer might be too high. While the default value for Scale In Lightmap is 1.0, setting it to 0.1 or 0.01, depending on the mesh, can result in an appropriate lightmap size.
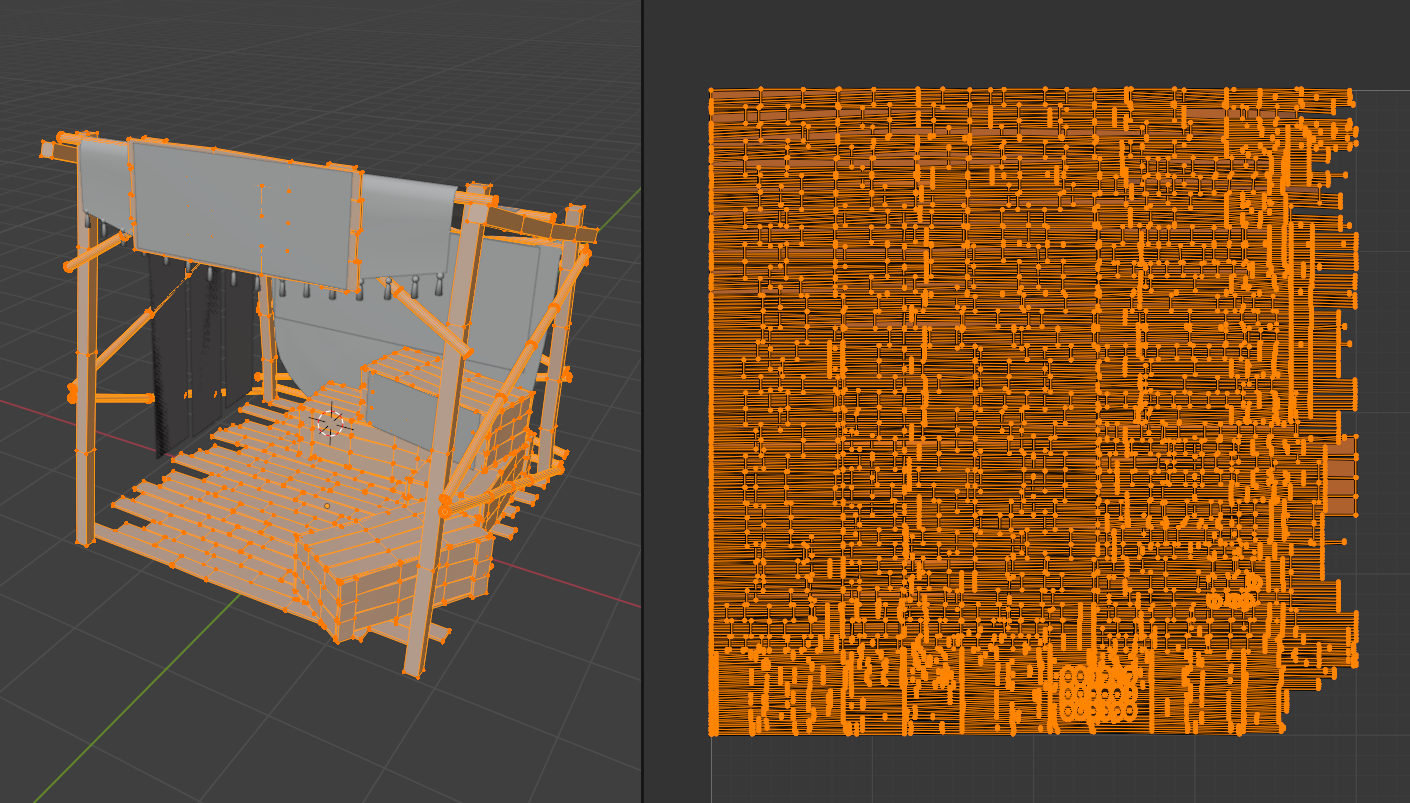
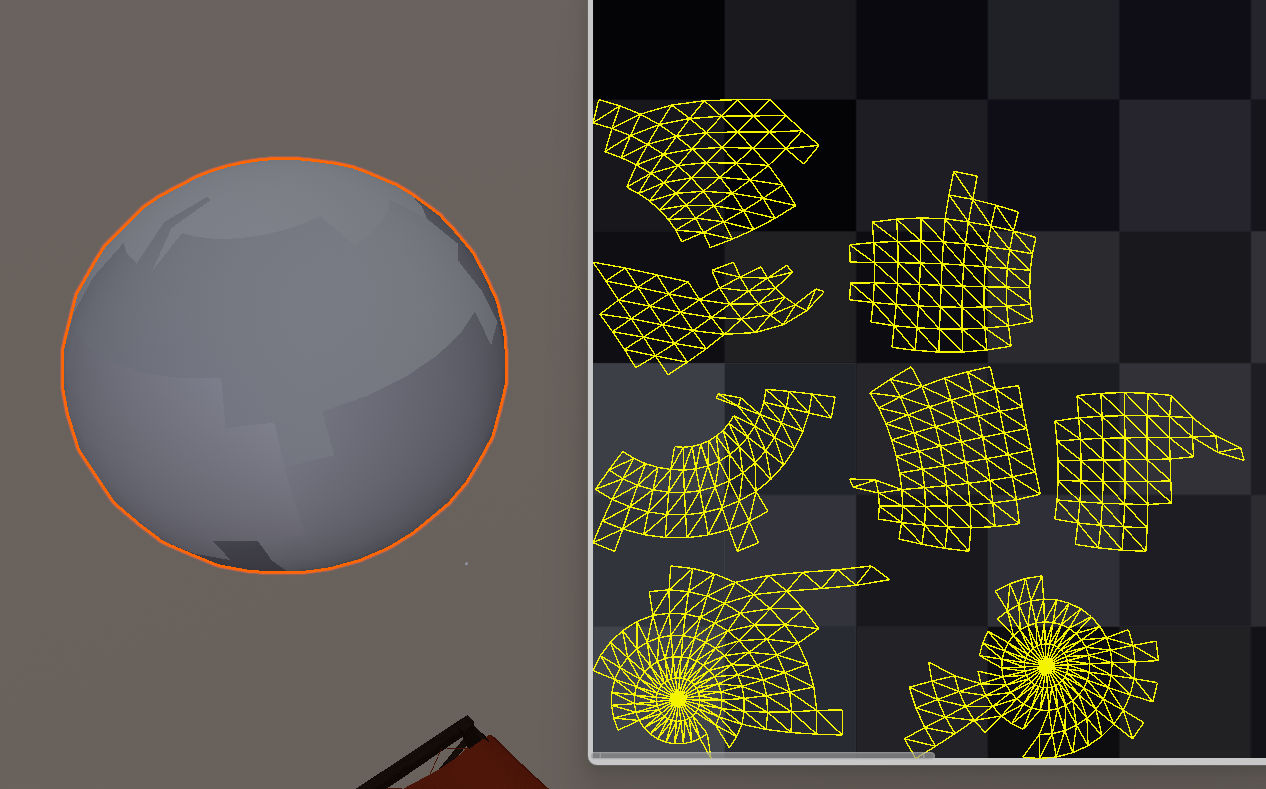
If the Mesh UV2 is unsuitable, light baking may take a long time. Check that the UV2 does not have any overlaps.
Example of unsuitable UV2 with overlaps
Example of OK UV2 without overlaps
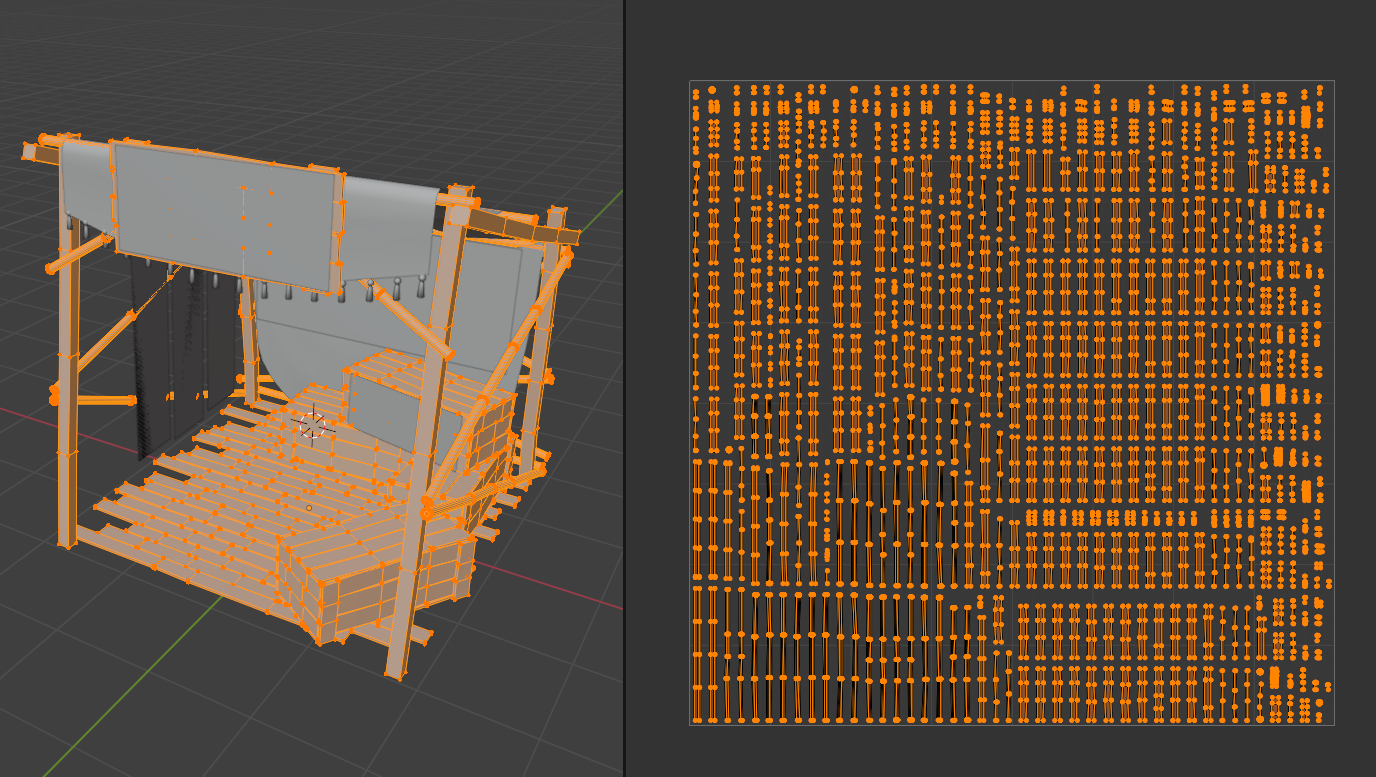
By enabling Generate Lightmap UVs in the FBX import settings, Unity will recreate the UV2. Please also try enabling Generate Lightmap UVs.

If other software utilizing the GPU is running, light baking may take a long time. Please close other Unity Editor instances, VRChat, or Discord screen sharing, and try again.
If there are overlaps in the Mesh UV2, abnormal shadow shapes will appear. Ensure the UV2 is free of overlaps. You can also try enabling Generate Lightmap UVs in the FBX import settings to have Unity recreate the UV2.
If enabling Generate Lightmap UVs causes the mesh to appear to be split into multiple parts, it can be better to create a suitable UV2 in modeling software such as Blender.
For meshes with complex curved surfaces (e.g., humanoid avatar models), using Light Probes with Contribute GI OFF often results in a cleaner final look compared to forcing lightmap baking. It could be better to intentionally turn Contribute GI off.
Check the Official Guidelines
Before submitting, please make sure to review the official rules and guidelines:
↑ Back to Top

